本章内容为个人探索。
在《抗锯齿》那一章中,增加了多次采样的逻辑后,程序的运行速度开始变得非常缓慢。多次采样是渲染真实感图像的基石,想要保持多次采样的同时加快程序的运行速度,就得另辟蹊径。
线程概念
在计算机中我们常听到进程与线程,进程是资源(CPU、内存等)分配的基本单位,通俗来说就是我们桌面上的每一个应用当点击QQ时,就创建了一个进程,我们所用的VS本地调式也是一个进程。线程是一条执行路径,是程序执行时的最小单位,他们之间的关系就好比一个部门和其中的每一个人,当然人越多干活越快,需要的总工资(内存和cpu资源)也越多。一个线程的使用示例代码如下:
1
2
3
4
5
6
7
8
9
10
11
12
13
| #include <thread>
func(par1, par2){...}
std::thread t(func, par1, par2...);
t.detach();
t.join();
|
建立输出管理类
单线程代码中,渲染循环是由主线程独自运行完成的。建立多个线程平摊渲染循环中繁杂重复的任务是很容易想到的多线程加速方案。
可以建立N个线程,让它们同时从不同行开始绘制。因为最终的ppm文件是有严格的顺序要求,每个线程绘制的像素都不可能都把画好的像素立即的输出到文件里,这里可以在内存上开一个缓冲区用来暂时存放结果,每个线程绘制好的像素先填入其中,等所有线程都绘制完成的时候,再将数组中的内容输出。
对于这部分缓冲区的管理,和最终输出到ppm文件的操作,我们可以封装到一个类里,创建imageoutput.h文件,敲入如下代码:
1
2
3
4
5
6
7
8
9
10
11
12
13
14
15
16
17
18
19
20
21
22
23
24
25
26
27
28
29
30
31
32
33
34
35
36
37
38
39
40
41
42
43
44
45
46
47
48
49
50
51
52
53
54
55
56
57
58
59
| #ifndef IMAGEOUTPUT_H
#define IMAGEOUTPUT_H
#include <iostream>
#include <fstream>
typedef unsigned char D_BYTE;
class imageoutput {
public:
imageoutput(int wth, int hgt, const char* file_nm) :width(wth), height(hgt) {
buffer = new D_BYTE[width * height * 3];
outFile = std::ofstream(file_nm);
outFile << "P3\n" << width << " " << height << "\n255\n";
}
~imageoutput() {
if (buffer != nullptr) {
delete[] buffer;
}
}
void write_buffer(const int& x, const int& y, const double red, const double green, const double blue) {
D_BYTE ir = D_BYTE(255.999 * clamp(red, 0, 0.999));
D_BYTE ig = D_BYTE(255.999 * clamp(green, 0, 0.999));
D_BYTE ib = D_BYTE(255.999 * clamp(blue, 0, 0.999));
int n = (y * width + x) * 3;
buffer[n] = ir;
buffer[n + 1] = ig;
buffer[n + 2] = ib;
}
void buffer_to_file() {
for (int j = (height - 1); j >= 0; j--) {
for (int i = 0; i < width; i++) {
int n = (j * width + i) * 3;
outFile << (int)buffer[n] << " " << (int)buffer[n + 1]
<< " " << (int)buffer[n + 2] << std::endl;
}
}
}
private:
int width;
int height;
D_BYTE* buffer;
std::ofstream outFile;
};
#endif
|
平摊渲染循环任务
输出管理类提供了写缓冲区和最终生成图片的函数,接下来的任务就很明确了:创建线程们调用write_buffer函数写缓冲区,再在main函数的最后,把缓冲区写成文件。
为了拆分渲染循环,我们把它从main中抽离,并且把与之相关的一些变量都改为全局变量,方便多线程共享调用。
以下代码会重构main函数所在文件,为保留之前的代码,建议新建RayTracingByMultithread.cpp文件作为新的main文件,老代码记得保存,新代码如下:
1
2
3
4
5
6
7
8
9
10
11
12
13
14
15
16
17
18
19
20
21
22
23
24
25
26
27
28
29
30
31
32
33
34
35
36
37
38
39
40
41
42
43
44
45
46
47
48
49
50
51
52
53
54
55
56
57
58
59
60
61
62
63
64
65
66
67
68
69
70
71
72
73
74
75
76
77
78
79
80
81
82
| #include "camera.h"
#include "rtweekend.h"
#include "color.h"
#include "hittable_list.h"
#include "sphere.h"
#include "material.h"
#include "imageoutput.h"
#include <thread>
const auto aspect_ratio = 3.0 / 2.0;
const int image_width = 400;
const int image_height = static_cast<int>(image_width / aspect_ratio);
const int samples_per_pixel = 100;
const int max_depth = 50;
int numThread = max(std::thread::hardware_concurrency(), (unsigned int)1);
imageoutput* buf;
hittable_list world;
camera* cam;
color ray_color(const ray& r, const hittable& world, int depth) {...}
hittable_list random_scene(){...}
void ray_tracing_by_thread(int k) {
for (int j = image_height - k - 1; j >= 0; j -= numThread) {
for (int i = 0; i < image_width; i++) {
color tmp(0, 0, 0);
for (int s = 0; s < samples_per_pixel; s++) {
auto u = (i + random_double()) / (image_width - 1);
auto v = (j + random_double()) / (image_height - 1);
ray r = cam->get_ray(u, v);
tmp += ray_color(r, world, max_depth);
}
tmp /= float(samples_per_pixel);
buf->write_buffer(i, j, sqrt(tmp[0]), sqrt(tmp[1]), sqrt(tmp[2]));
}
}
}
int main() {
world = random_scene();
buf = new imageoutput(image_width, image_height,"image.ppm");
std::vector<std::thread> threads;
point3 lookfrom(13, 2, 3);
point3 lookat(0, 0, 0);
vec3 vup(0, 1, 0);
auto dist_to_focus = 10.0;
auto aperture = 0.1;
cam = new camera(lookfrom, lookat, vec3(0, 1, 0), 20, aspect_ratio, aperture, dist_to_focus);
for (int k = 0; k < numThread; k++) {
threads.push_back(std::thread(ray_tracing_by_thread, k));
}
for (auto& thread : threads) {
thread.join();
}
buf->buffer_2_file();
delete cam;
delete buf;
}
|
既然选择使用文件流的方式创建文件,那么也不需要使用命令窗口了,可以直接点击vs中的本地调试以生成文件,紧接着就可以在代码所在目录下找到image.ppm文件了。
如果还是采用命令行的方式生成(不使用重定向符号,命令行中直接运行exe),image.ppm文件会生成在exe文件同目录下。
如果本次生成感到卡顿,可以降低线程数量,但总体来说,生成文件的速度肯定比单线程要快上好几倍。
进度提示
最后一步,加上进度提示。
先在每个线程里对共享的记录变量进行操作:
1
2
3
4
5
6
7
8
9
10
11
12
13
14
15
16
17
18
|
int line_remain = image_height;
int thread_remain = numThread;
void ray_tracing_by_thread(int k) {
for (int j = image_height - k - 1; j >= 0; j -= numThread) {
for (int i = 0; i < image_width; i++) {
...
buf->write_buffer(i, j, sqrt(tmp[0]), sqrt(tmp[1]), sqrt(tmp[2]));
}
--line_remain;
}
--thread_remain;
}
|
然后在main函数里进行记录,这次把线程改成detach于主线程。因为主线程可以通过thread_remain来判断线程们的运行情况,就不必担心主线程会先结束了,并且还可以利用主线程的等待时间进行进度的显示:
1
2
3
4
5
6
7
8
9
10
11
12
13
14
15
16
17
18
19
20
21
22
23
24
25
| int main() {
...
cam = new camera(lookfrom, lookat, vec3(0, 1, 0), 20, aspect_ratio, aperture, dist_to_focus);
for (int k = 0; k < numThread; k++) {
threads.push_back(std::thread(ray_tracing_by_thread, k));
}
for (auto& thread : threads) {
thread.detach();
}
while (thread_remain > 0) {
std::cerr << "\rScanlines remaining: " << line_remain-1 << ' ' << std::flush;
}
std::cerr << "\nDone.\n";
buf->buffer_2_file();
delete cam;
delete buf;
return 0;
}
|
这样控制台就会有进度提示了。
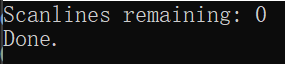
数字刷新速度开始很慢,这说明在程序运行的一开始,main函数中的while循环争取到cpu的频率不高,cpu大多被副线程们占据,最后会随着副线程们一个个全都完成,主线程能争取到的cpu时间会变多,刷新速度变得顺畅。
锁
注意到line_remain和thread_remain变量在同时被多个线程访问中所产生的问题吗?如果有那么一个时刻,有两个线程同时拿取了line_remain的值——假设是53,他们同时对其进行—操作,然后相继写回了它们各自认为的正确的值——52,实际上这个值是错误的,有两个线程在同一时刻完成了图片中的某行的渲染,这个值理应减到51。
对变量加同步锁,可以完美的解决这个问题。
1
2
3
4
5
6
7
8
|
some_mutex.lock();
...
some_mutex.unlock();
|
锁的本质是创造一个只有一个线程可以独享的区域,上述代码中,some_mutex是个同步信号量,对其实行lock()操作意味有某个线程想要占有这枚锁,之后所有想要拥有这枚锁的线程,都必须要等待本线程释放掉它。
在lock和unlock之间的代码,在同一时间里,至多只有一个线程执行。这样就避免了同时写变量,导致变量值出错的问题:
1
2
3
4
5
6
7
8
9
10
11
12
13
14
15
| #include<mutex>
std::mutex line_remain_mutex;
std::mutex thread_remain_mutex;
for (int j = image_height - k - 1; j >= 0; j -= numThread) {
for (int i = 0; i < image_width; i++) {
...
}
line_remain_mutex.lock();
--line_remain;
line_remain_mutex.unlock();
}
thread_remain_mutex.lock();
--thread_remain;
thread_remain_mutex.unlock();
|
用宏控制要执行的代码块
因为之后依然是在单线程模式的基础上进行编写的,有时候需要切回单线程模式,来回黏贴代码很麻烦,可以使用如下方式自由的在两种模式之间切换,首先,确保项目目录下有第十五章结束时候的main函数所在文件和本章新创建的文件。
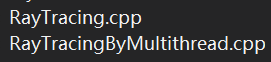
在老文件RayTracing.cpp(当然你的可能不叫这个名字)中加入如下宏,包裹所有的代码:
1
2
3
4
5
6
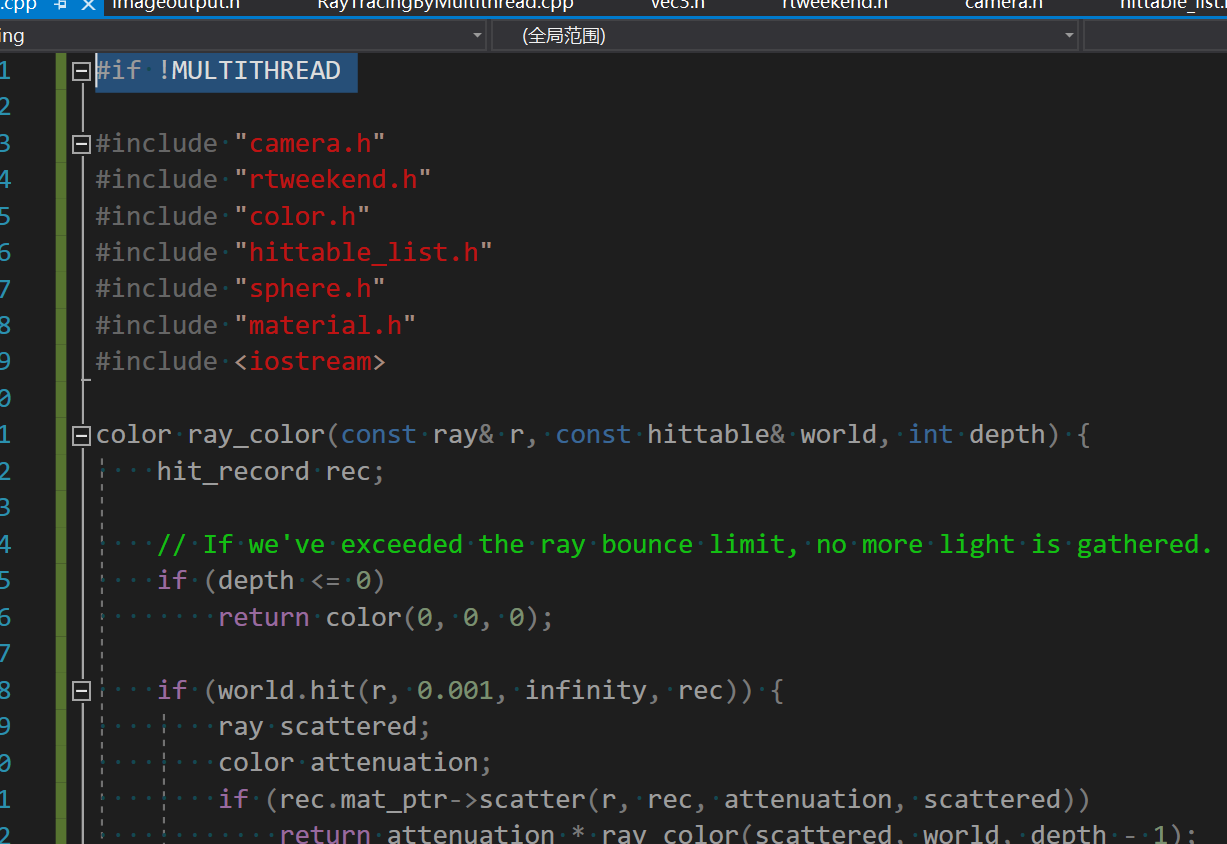
| #if !MULTITHREAD
...
#endif
|
在新文件中使用同样的操作:
1
2
3
4
5
6
| #if MULTITHREAD
...
#endif
|
接下来尝试添加一下预编译命令,此处展示vs中更改预编译命令的方法:
注意,一定要保证修改的配置页是当前的代码环境,比如下图中修改的是“活动(Release)”-“活动(Win32)”平台,如果你的代码是Debug平台或者是x64,此更改并不会生效。

添加MULTITHREAD命令,本程序便会进入多线程模式:
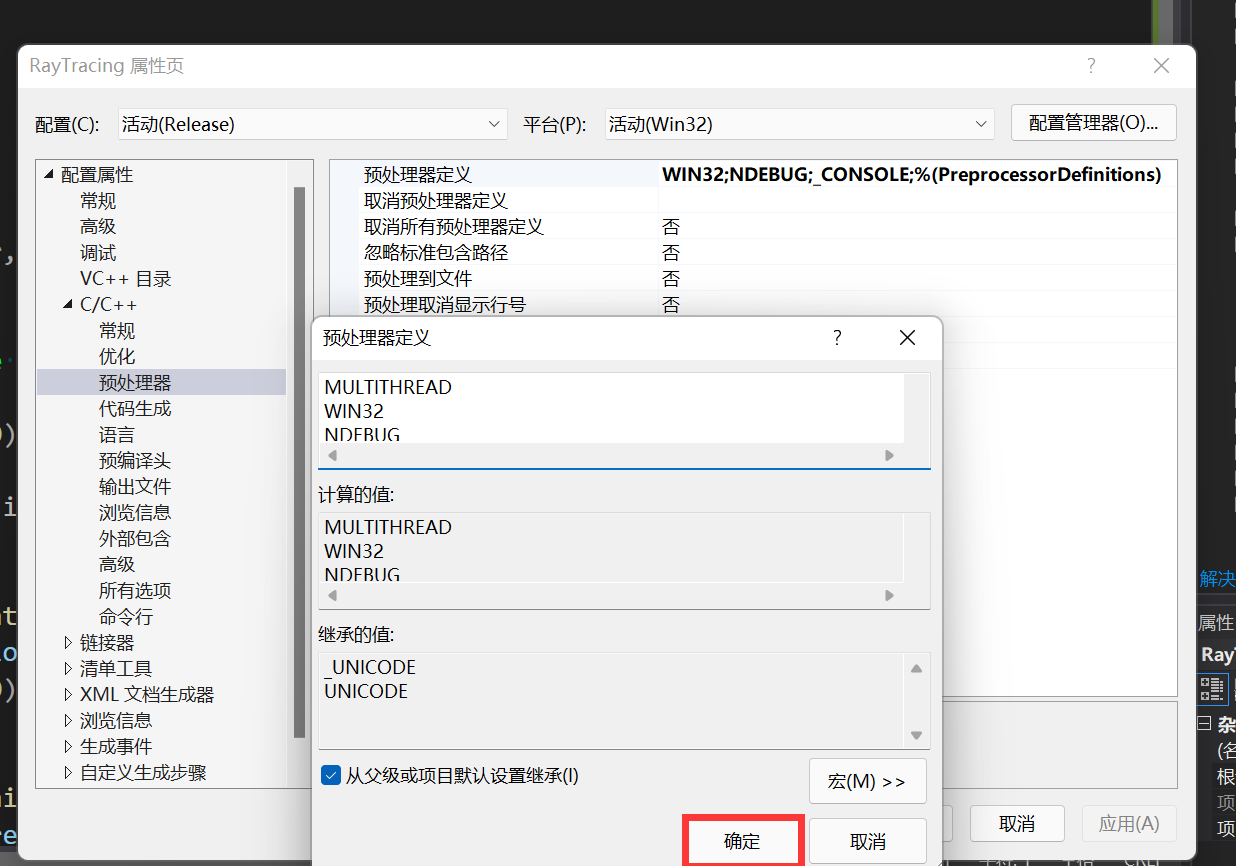
添加完成后,显示如下:

在MULTITHREAD的宏定义成功后,老文件中的代码应该全显示为灰色。
如果想使用单线程,就再次编辑上述预处理器文本,删除MULTITHREAD命令即可。
其他编辑器有各自的预处理命令的添加方式,或者你可以通过新建一个.h文件作为配置文件,再把#define MULTITHREAD 1or0输入到配置文件中,来定义并使用宏。
拓展
- 我使用的是互斥锁来进行加锁,尝试使用其他方法来对临界区访问(也就是互斥区),如: